Dyeing Table

It is best to have a separate area (well away from your primary work area) for your dyes. I have a separate table in my “studio” (aka basement) for mine. When I teach, I try and keep the dyes a long way away from my students’ work area. Mind you, you don’t need and actual separate table–a counter or other such space will work as well.
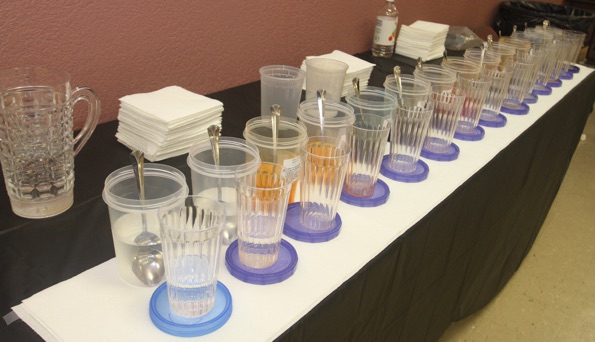
The dye table should be well covered to keep the dyes from staining it. Dyes WILL spill, so it’s best to be protected. A layer of newspapers with a single layer of paper towels on top works quite well. The paper towels keep the newsprint ink from getting all over everything, as plain newspaper can be “dirty” because the ink often rubs off. Another option is using a cheap plastic table cover for the bottom layer. At home I cover this with brown butcher’s paper. In class I place a “runner1” of paper towels several sheets thick under the dyes. You can see this in the photo above.
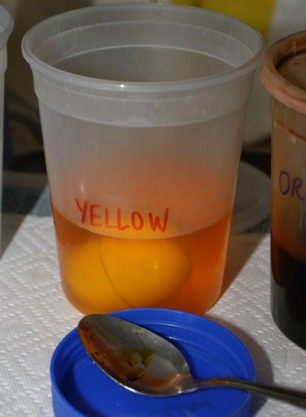
In this class, as in most of my classes, we were working with emptied eggs, so I have placed plastic drinking glasses in front of each jar of dye, on the plastic lid, to be used weigh the eggs down. Water is added to each individual the glass in just the right amount to provide enough weight to submerge the egg.
Note also the stacks of paper towels, already folded, two empty jars (for the spoons), a bottle of vinegar, and the pitcher of water (for filling the glasses). DO NOT store your metal spoons in a glass container, as they will eventually break it.
It helps to have the dyes placed in a sequential order. I start with vinegar rinse on the far left, then place the dyes in the order they should be used. Students (and helpers) are instructed that they can only go forward, not back, when dyeing.
At home I mix up the vinegar rinse frequently, as it gets scummy after a while from the dissolving calcium carbonate. For class I usually mix up two jars of rinse, and they will last for the entire class. I use Ziplock Twist’n’Loc (or generic equivalent) plastic quart containers for both my vinegar rinse and for my dyes. You can use other containers, glass or plastic, but I have found, over the years, that these work best for me. They are heat tolerant, so I can mix up my dyes in them, and they are lighter and don’t break. The plastic lids seal tightly and don’t leak–these are hot soup containers, after all.
The dyes should have been mixed up beforehand and cooled to room temperature. It is a good idea to label the jars, and not just the lids. I tape the packet label to my jars (bottom arrow), and date it (top arrow), so that I will know when the dye was prepared:
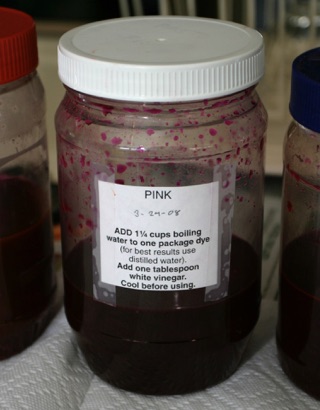
Dyes, as I noted before, can be stored in either glass or plastic jars. If using glass jars, though, plastic lids should be used, as the metal ones will rust from the vinegar.
I place my jars in a more or less light-to-dark sequence, both at home and when I teach classes. At home I do it to keep organized, so I can find the colors when I need them. In class I organize them this way to help my assistants and my students know which dyes come before or after which. When the dyes are in use, I place the lid in front of the jar, and rest the spoon on it.
If the dye is free, the spoon is placed into the jar.
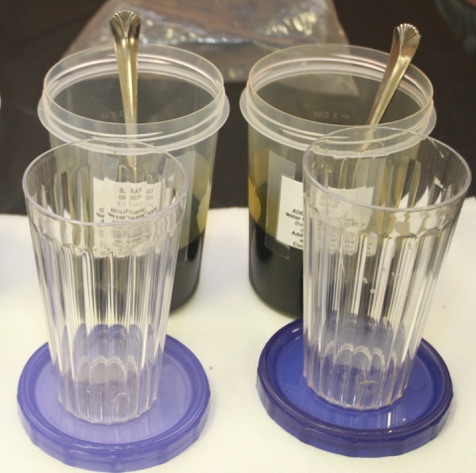
I have begun using red Solo cups for my pysanka classes. They are tall and wide, and fit well into the Ziplock quart containers I use for my dyes. They also stack, which is a great help with storage and transportation. I place them on the jar lids in front of the dyes:

I use the same basic set of dyes and the same sequence for all of my classes. For bigger classes (more than a handful of people), I double up on the dyes that usually cause bottlenecks: yellow, red and black. The sequence is thus:
Vinegar rinse (2)  Yellow (2)
  Light Blue
  Light Green
  Orange Rinse
  Orange
  Red Mix (2)
  (Final colors) Dark Red
  Royal Blue
  Black (2)
Notes:
-
1.Orange Rinse is just a jar of UGS Orange (or any other vinegar free orange dye). The second orange can be either a jar of the same, or a vinegar based Orange, like that from UEC (Tofino Sunrise).
-
2.Light Green, if needed in small quantities can be daubed on with a Q-tip (spot dyeing). So can Light Blue, bu tit should be daubed onto a white egg, not a yellow one.
-
3.Red Mix is just a pack each of UGS Scarlet and Red. They produce 3 cups of dye, so you have enough for two jars.
-
4.There are three final colors; only one should be used per egg. Royal Blue works well only over yellow, green or blue. Dark Red works best over orange or red, Black covers everything,
I try to keep the dyeing (and the work area) are as free of loose, crumpled paper towels as possible. When teaching, I prepare the paper towels ahead of time by tearing square sheets off of the roll, folding them into quarters, and stacking them. Eggs are dyed by myself or an assistant, dried fully, and handed back to the student, sans towel. These squares are kept stacked on the table, behind the line of dyes, in several piles sorted by color. They are reused until wet, and which point they are dropped into a Trader Joe’s they grocery bag standing on the floor. The used towels, once dried out, can be reused later (after class), either for dyeing or  for wax removal2.
I generally use Costco brand paper towels for one time classes–they are absorbent without being too expensive, and are also great for use in removing wax, so they serve a double function.
At home I use Viva towels and the three basket system. I have three tallish waste baskets under the drying table. One of the baskets under the table is filled with yellow and red spectrum used towels. The other basket stores the rest of my used towels: greens, blues, dark colors. I grab an appropriately colored used towel from one of the baskets, gently dry the egg(s), and then drop it into the third basket, for “wet” towels. When the third basket fills up, and after the towels have dried out thoroughly, I sort them (by color) back into the first two.
I also use Viva towels when teaching pysankarstvo at camp, as the students can come to multiple classes and during their free time to work on eggs. After the first class, they usually understand the concept of dye progression (or know enough to ask for advice), and are allowed to dye their own eggs. We dry the Viva towels overnight, hanging them on tables, chairs, and anything else that doesn’t move fast enough.
Viva towels are thick, absorbent, sturdy, and seem to last forever. They are more expensive than ordinary paper towels, but are cheaper in the long run. I’ve been using some of the same towels for more than ten years. I keep a stack of clean, white Viva paper towels near the dye table as well, but rarely use them, and then only if I run out of yellow towels, or need a towel for a pastel shade.
As in class, I fold my paper towels into quarters (in half twice) before I use them. This allows neat stacking in the two storage baskets, easier use, and easier sorting afterwards from the “wet” basket.
__________
-
1.I take the runner home after class, spread it out and let it dry overnight. The next day I can tear it into squares, and fold those up for reuse, usually for wax removal.
-
2.Paper towels are sturdy and absorbent, and are great for removing melted wax from pysanky. I use the less expensive towels for this, and can usually clean 2-4 pysanky with one paper towel, by unfolding and refolding and using all sides of the towel, depending on how much wax is on the egg. Viva towels absorb well, too, but using them for this purpose would be a waste.
Kleenex type tissues are usually too flimsy to do a good job of wax removal, but are good for use with solvents for removing residual wax. Toilet paper, especially the Soviet variety, does a relatively good job of wax removal, too.
Updated 4-5-2019


Back to Main Dyeing page
Back to Main Pysankarstvo page
Search my site with Google
Prepare your dyeing work area