Dyeing Problems:
Dye Seepage
Dyeing Problems:
Dye Seepage

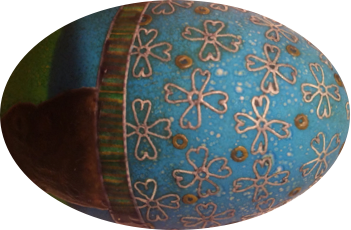
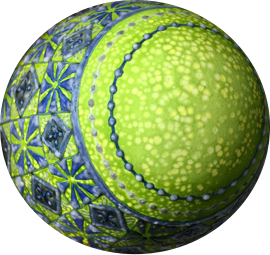
PROBLEM: This problem is unique to emptied eggs; those working with full eggs will not come across it while writing pysanky. You will sometimes notice spots or freckles that bloom moments after the egg is removed from the dye. These are usually lighter than the new color, and are those of the previously dyed color. See the spotting in the two pysanky above.
CAUSE: There are several theories as to what causes this issue; it is thought that the fault can be an incompletely sealed hole, a leaky membrane or a small crack in the shell. In my opinion, while a poorly sealed drain hole or tiny crack can contribute to the problem by allowing dye into the egg, if the membranes are intact the dye will remain inside of the egg. I have seen, in my workshops, eggs with a leaky seal which have allowed a teaspoon or more of dye to leak into an egg, without a single blemish appearing on the surface.
So what is the mechanism of action here? If the membrane lining the inner aspect of the eggshell has broken down, as it can in eggs that have been emptied, dye can seep into the egg through the shell, and then back out again, causing spots of color. This egg shows the dye actually leaking out through the shell:

SOLUTION: the “Freezer method.” This was developed by Bohdan Kostyshyn, and shared with the Yahoo Eggs-Pysanky group by Susannah (message 10958, April 2002):
Preventing Spots by Using the Freezer Method
To prevent the spots from appearing:
1. Fill the blowhole in the egg with a small ball of wax, and run the hot kistka around the edge to seal it airtight.
2. Place the egg into your freezer for a few minutes. Make sure you don't put it on anything wet! If you leave it too long, it will get frosty, which may temporarily affect how the egg takes the dye. Warm it up, dry it off and chill it again.
3. Take the cold egg out of the freezer and place it immediately into the dye bath. You may notice a little "fizzing" as the air inside the egg expands, keeping the liquid from getting in. Try not to handle the egg with your hands too much, as this will heat the air inside the egg, stopping the beneficial effect. This has to do with the laws of physics (Boyle's Law and Charles' Law) concerning pressure and temperature.
4. When the egg is finished in the dye, pat it dry and break the seal in the wax hole.
5. Write on the egg as desired, then seal the hole and put it back in the freezer for the next dye.
Freezing the egg before dyeing, as described above, will usually solve the problem. In cases where it doesn’t, it has been suggested that “If you have an egg that seems spotty beyond all saving, try to cover it up with a mottled finish: Dip several sponges in complementary colors (for example, blue/green/purple or red/yellow/orange) and sponge the colors onto the freckled area. Try for a marbled effect.”
Photo credit: Caroline Södergren ©2017, Selena Blair Oliveira © 2015, Christie V. Allen ©2019
Back to Main Dyeing page
Back to Main Advanced Dyeing page
Back to Main Pysankarstvo page
Search my site with Google
Little spots of dye