Drying

Pysanky need time to dry out properly after varnishing. When working with polyurethane, it usually takes at least 24 hours for the varnish to dry completely–longer if the air is damp, as in the summer, but often much more quickly when the air is dry, as in the winter. The eggs must be allowed to dry undisturbed until they are NO LONGER STICKY to touch. If you remove them too soon, and place them in an egg carton, they will stick to the carton.
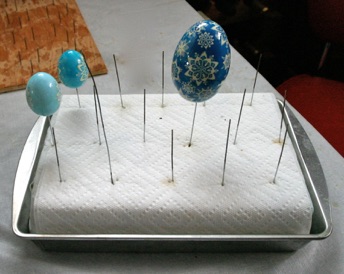
I have a small card table I use as a drying table. It is covered with a cheap plastic table cover to protect it from the varnish, and is in a clean, quiet corner of my basement. There is no debris here that can fall onto the eggs (like pet hair), and no one to knock them off of their drying racks.
There are three different ways of drying pysanky, depending on whether you are working with full or emptied eggs.
“Bed of Nails”
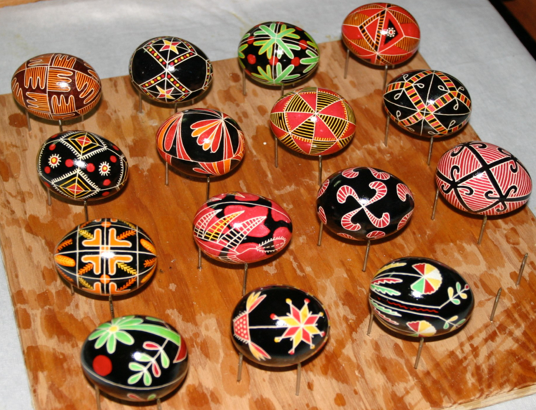
This is the old-fashioned drying rack, and it is most appropriate for drying full, varnished eggs.
You can purchase this type of rack from any major pysanka supplier, or you can make your own from a small sheet of plywood and a bunch of round head nails. Draw a series of app. 1.5 inch diameter circles on the wood, and then place three nails into the edges of each circle. A quick and easy way to create this sort of drying rack for a single egg is to stick three tacks through a piece of cardboard.
Before varnishing the eggs, check out the drying rack to make sure all the nails are clean. If there is any old varnish sticking to the tips, remove it (e.g. with a knife), as the old bits of varnish can stick to the new eggs, causing bumps in the finish, or can cause the eggs to stick to the nail and result in varnish being ripped off when the eggs are later removed from the rack.
Once the egg is evenly – but not thickly – coated, I place it on the drying rack. Remember, it is better to do a second coat...and even third one...to get a nice glossy finish, rather than apply the varnish was too thickly and end up with a pysanka covered with bumps and drips!
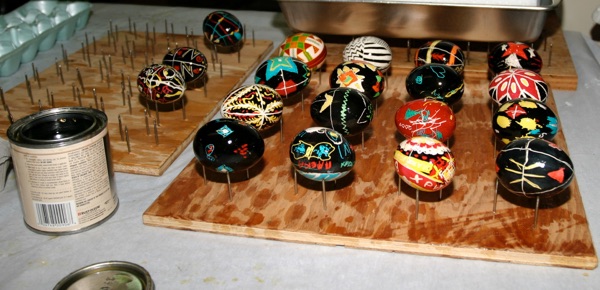
Newly varnished pysanky on the drying rack
As noted before, it usually takes at least 24 hours for the varnish to dry completely, so be patient. Leave the eggs on the drying rack until they are no longer sticky to touch. If you remove them too soon, and place them in an egg carton, they will stick to the carton, and this might ruin the finish.
When removing the eggs from the rack, be careful. The varnish can sometimes stick to the nail, and pulling the egg off can also pull of a large section of varnish from the shell.
Wire Rack
This type of rack can only be used with eggs which have already been emptied.
This is also my preferred method for drying varnished emptied eggs; while I prefer to work on full chicken eggs when possible, I tend to drain my goose and duck eggs in advance, as they go bad quite quickly, even when refrigerated.
If I wish to apply a second....or third.....coat of varnish to an egg, as I often will with my non-traditional pysanky, especially those made as gifts, I do so after I’ve emptied the egg and it has been properly drained. Rather than using a nail bed type of drying rack, and risking more marks from the nails, I use a wire drying rack.
My version of this rack is made with floral supplies–green floral styrofoam and rigid floral wire–and an aluminum cake pan. Instructions are given below.
I varnish the eggs as before, giving a thin, smooth coat of varnish, and then impale them through the drain hole onto the wires:
Wire drying rack that can be used with emptied eggs
The wire is just slightly narrower than the hole in the bottom of the egg, so the egg fits on securely but with room to spin. Once the eggs are on the wires, I leave them there until they are completely dry. And once they are dry, I just slip them off the wires. This type of rack has the advantage of not leaving nail marks on the surface of the pysanka, as can sometimes happen with nail type of rack.
I have read that other people use kabob skewers in a similar manner for drying eggs. I find that there are two disadvantages to the skewer method:
-
1.Kabob skewers are much wider than floral wire, and much wider than the hole made by the Blas-Fix drill. This means having to use another, less simple method (e.g. Dremel tool) to create the drain holes, and the result is a larger, less aesthetically pleasing feature.
-
2.Varnish can stick to wooden skewers. This means more difficulty removing the skewer from the egg, and the need to dispose of the skewer after a single us. Metal wire, on the other had, does not have this issue, and can be reused hundreds of times.
I have found that, after much use, the wires may rust a bit (if they get exposed to water from the inside of recently drained eggs). This was happening when I gave a second coat of varnish to recently emptied eggs. I have since stopped doing that. However, if happens, you can pull the wire out, flip it over, and push the rusted end down into the styrofoam.
To make this wire drying rack, I wrapped two green floral styrofoam blocks in paper towel, taped the paper towel with paper tape, and set the resulting block down in an aluminum cake pan. The paper towels holds the blocks of styrofoam together, and catches drips. It can be replaced if it gets messy.
I cut lengths of floral wire, the stiff kind, into two different lengths with wire cutters, and pushed them into the styrofoam blocks.
The total wire length should be greater than that of the long diameter of an egg plus the thickness of the styrofoam. I made two different lengths, for chicken and goose eggs. (If you make the wires long enough, you can use the rack for any sized egg from quail to goose, as long as you space properly.)
The wires should be spaced so that the distance between any two is at least the width of an egg, and preferably any more. You don’t want eggs getting too close and sticking together.
Coat Hanger Rack
John at All Things Ukrainian uses a “spin dry” method of varnishing on his site. He uses a modified coat hanger for this process. The coat hanger is used to create a single egg rack.
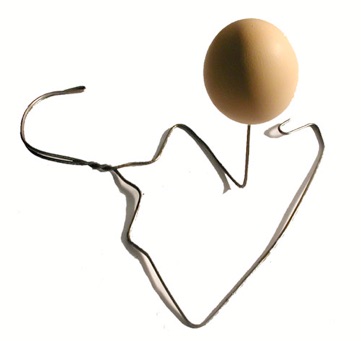
This rack has the advantage of being quickly made for material that is ubiquitous and free–wire coat hangers. While each such rack only holds a single eggs, it would be easy enough to create several.
You can go to his site here for instructions on making the eggs stand, or watch the video on the previous page.


Back to Main Finishing page
Back to Main Pysankarstvo page
Search my site with Google
Letting the Varnish Dry