Setting Up:
Dye Set
Setting Up:
Dye Set

Mies Van Der Rohe often noted, when discussing design, that “Less is more.” By this he meant that simplicity and clarity lead to good design. What is true in architecture and design is true as well in pysankarstvo. A well designed, simple pysanka with a few colors is often more pleasing aesthetically than one with excessive detail and a multiplicity of colors.
When teaching pysankarstvo, I like to keep the dyes to a reasonable number. When we write pysanky at my sister-in-law’s house, where most of the participants are seasoned pros, we put out every jar that she owns (the complete UGS series plus a few extra) and have few problems. When I teach classes, though, I try to keep the number of dyes much lower.
You can create any sort of dye set you like for your classes, but you should keep in mind that the more choices there are, the more confusing things get, especially at first. If you have a pattern you will be teaching, bring the dyes you will need for that particular pysanka. If not, take into consideration the skill level of your students, the space you have available, and whether you will have to schlep the dyes long distances.
Also, consider how many students you will have. if there are a half dozen or so, one dye of each color is plenty. If you have numbers in the teens or higher, consider extra jars of the most commonly used colors, to avoid back-ups at the dye table. I usually double (have two jars each of)
Yellow
Red
Black
I also have two jars of Orange, one used as a rinse, and one as a dye.
Below are a few of the dyes sets that I use. I generally use UGS (Ukrainian Gift Shop) dyes–they are the workhorses of the pysanka world, used by professional pysankary everywhere. I have used them for decades, and they are reliable and predictable. I use a mix of two of their reds (Red and Scarlet), aka “Red Mix,” for all my classes.
SET 1: ABSOLUTE BEGINNERS For a class of absolute beginners, I use only a bare minimum, enough to make a simple to moderately complex pysanka:
Yellow, Orange, Red Mix, Black and Light Green (for spot dyeing)
These colors are adequate for making most traditional pysanky and diasporan pysanky. If you have a nice brown or dark red dye that you really like, this might be a worthwhile addition, as an alternate final dark color. If you are really short on time, Yellow, Red and Black will suffice.
SET 2: ADVANCED BEGINNERS For a group that’s written pysanky before, I add Light Blue, Royal Blue and Dark Red to the basic set, as well as a jar of Orange Rinse. This sequence allows for more creativity, and for the ability to create blue-green spectrum pysanky. It also provides a choice of three different colors to use as the final color. Note that the Dark Red, when used over red or orange, usually provide a nice, deep mahogany color, a lovely rich red-brown.
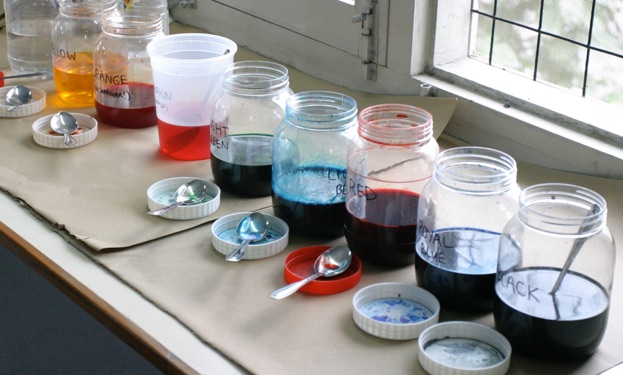
This is the dye set (sans Dark Red) shown in the photo at the top of this page, and in the photo below. It is the dye set I usually use for most of my classes at our Ukrainian school and in India:
Yellow, Light Green, Light Blue, Orange Rinse, Orange, Red Mix,
Dark Red, Royal Blue and Black
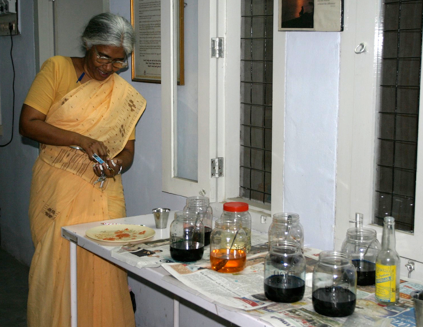
Sara overseeing our pysanka dyes at the LCECU, Vellore, India
SET 3: BROWN EGGS On rare occasion I have had no option but to use brown eggs for writing pysanky–in some parts of the world brown eggs are the only type available. In this situation, even fewer dyes are needed: Red and Black, and perhaps another dark (final) color or two: Royal Blue, Dark Red, etc.
The loveliest combination on these eggs, in my opinion, is red and black, but the natural beige egg shell and a final dark color work nicely, too. (To see how dyes look on brown eggs, go here.) An example of the lovely effect you can get with a minimal number of dyes:
The loveliest red for these eggs is “Red Mix,” a mix of UGS Scarlet and Red (one packet of each dissolved in about 2.5 cups of water, and split between 2 jars). At summer camp in 2009 we had only brown eggs, and used only this red and black to create gorgeous pysanky. Below is our simple dyeing table:
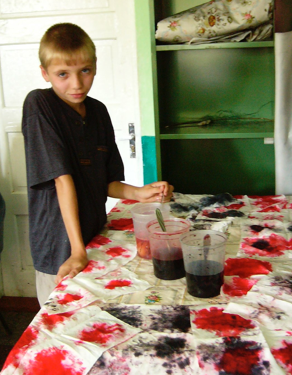
Our dye table at camp in Kolochava, Ukraine, 2009
(At camp we had to constantly recycle our paper towels, as they were few and we were in a village far away from modern conveniences. The table in the photo above is covered in paper towels that are being dried for re-use. The vinegar rinse in the container on the left has inexplicably turned pink.)
Back to Main Teaching page
Back to Main Pysankarstvo page
Search my site with Google
Selecting Your Dye Set